

SUMMARY
Implementing Secure JWT Authentication in 2026
A comprehensive guide to implementing JSON Web Token (JWT) based authentication for your backend applications, covering best practices, common pitfalls, and essential security considerations for 2026.
Keywords: JWT, Authentication, Backend Security
TABLE OF CONTENTS
1. Introduction: Why Secure JWT Authentication Matters in 2026
2. Understanding JWT Fundamentals
3. Step-by-Step JWT Implementation Guide
4. Addressing Common JWT Security Challenges
5. Best Practices for JWT Security in 2026
6. Real-World Use Cases for JWT Authentication
7. Conclusion: The Future of JWT Authentication
INTRODUCTION
Why Secure JWT Authentication Matters in 2026
In the rapidly evolving landscape of web development, robust and scalable authentication mechanisms are not just a luxury, but a fundamental requirement. As we navigate 2026, the proliferation of Single Page Applications (SPAs), mobile apps, and microservices architectures has cemented JSON Web Tokens (JWTs) as a cornerstone for API authentication.
Unlike traditional session-based authentication, JWTs offer a stateless, self-contained approach that significantly simplifies cross-domain and distributed system authentication. However, the power and flexibility of JWTs come with a critical caveat: security.
Misconfigurations or a lack of adherence to best practices can expose your applications to severe vulnerabilities, ranging from unauthorized data access to complete system compromise. With cyber threats becoming increasingly sophisticated each year, understanding and implementing secure JWT authentication is paramount for any backend developer.
This guide aims to provide a comprehensive analysis of JWTs, detailing their structure, implementation, and most importantly, the essential security considerations and best practices you must adopt in 2026 to protect your applications and user data.
The shift towards API-first development means that more and more interactions happen over HTTP, often without the traditional browser session. JWTs excel in this environment by providing a secure way to transmit user identity and authorization claims between parties.
For instance, a mobile app might authenticate with your backend, receive a JWT, and then use that token to access various protected API endpoints without needing to re-authenticate with each request. This efficiency, combined with the token’s cryptographic signing, makes JWTs an attractive solution.
But remember, “attractive” does not automatically mean “secure” without diligent implementation.
KEY POINT
In 2026, JWTs are indispensable for stateless API authentication, but their security relies entirely on correct implementation and adherence to evolving best practices. Neglecting security can lead to critical vulnerabilities.
CORE CONTENT
Understanding JWT Fundamentals
Before diving into implementation, a solid understanding of JWT’s core components and how it differs from other authentication methods is crucial. A JWT is a compact, URL-safe means of representing claims to be transferred between two parties. The claims in a JWT are encoded as a JSON object and digitally signed, ensuring their integrity and authenticity.
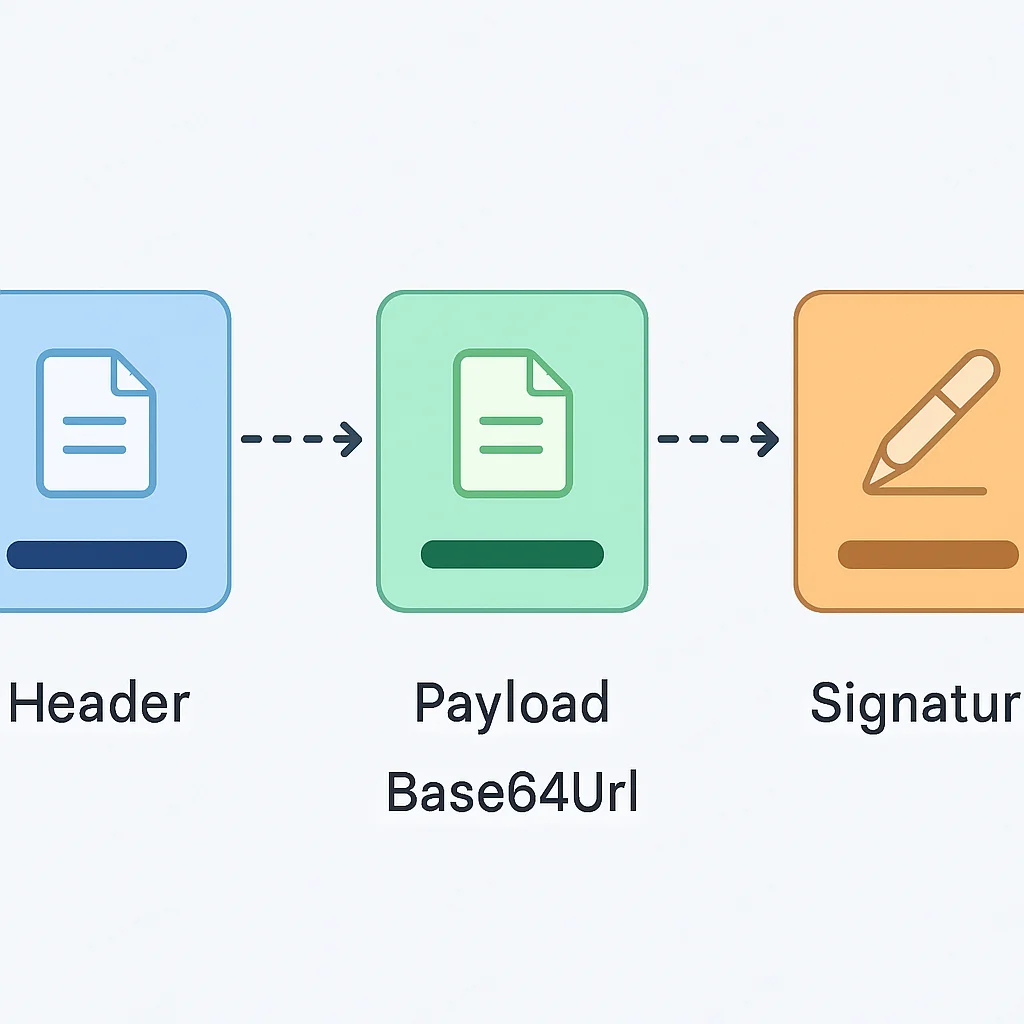
The Structure of a JWT
A JWT consists of three parts separated by dots (.):
1. Header: Typically consists of two parts: the type of the token (JWT) and the signing algorithm being used, such as HMAC SHA256 or RSA. Example:
{
  "alg": "HS256",
  "typ": "JWT"
}
This JSON is Base64Url encoded to form the first part of the JWT.
2. Payload: Contains the claims. Claims are statements about an entity (typically, the user) and additional data. There are three types of claims:
- Registered Claims: Predefined claims like
iss(issuer),exp(expiration time),sub(subject),aud(audience). These are not mandatory but recommended for interoperability. - Public Claims: Can be defined by anyone using IANA JSON Web Token Registry or by a URI that contains a collision-resistant name.
- Private Claims: Custom claims created to share information between parties that agree to use them. For example, a user’s
userIdorrole.
Example payload:
{
  "sub": "1234567890",
  "name": "Kwonglish User",
  "admin": true,
  "iat": 1678886400, // Issued At (March 2026)
  "exp": 1678887000  // Expiration Time (600 seconds later)
}
This JSON is also Base64Url encoded to form the second part of the JWT.
3. Signature: To create the signature part, you take the encoded header, the encoded payload, a secret, and the algorithm specified in the header, and sign that. For example, if you use the HS256 algorithm, the signature is created as follows:
HMACSHA256(
  base64UrlEncode(header) + "." +
  base64UrlEncode(payload),
  secret
)
This signature is used to verify that the sender of the JWT is who it says it is and to ensure that the message hasn’t been tampered with. The secret must be kept confidential on the server side.
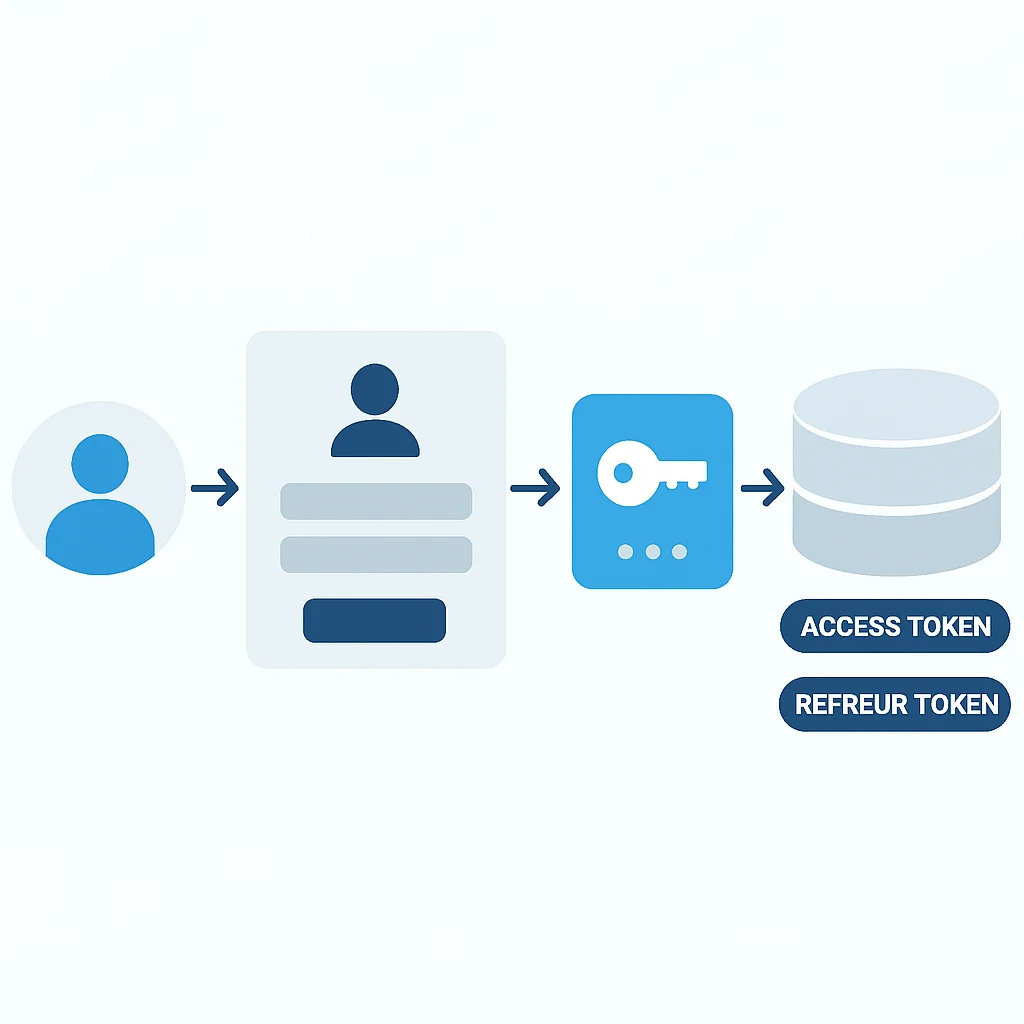
Access Tokens vs. Refresh Tokens
A common and highly recommended pattern for JWT authentication involves using two types of tokens:
- Access Token: Short-lived (e.g., 5-15 minutes). Used to access protected resources. If compromised, its short lifespan limits exposure. It’s typically stored in memory or an HTTP-only cookie to mitigate XSS risks.
- Refresh Token: Long-lived (e.g., 7 days to 30 days). Used to obtain new access tokens once the current one expires. It must be stored securely, ideally in an HTTP-only, secure cookie, and often associated with a database record for server-side revocation.
This dual-token strategy significantly enhances security by minimizing the window of opportunity for attackers to exploit a stolen access token and providing a mechanism for graceful token invalidation.
JWT vs. Session-Based Authentication: A Comparison
Understanding the trade-offs between JWT and traditional session-based authentication is key to choosing the right approach for your application in 2026. Here’s a comparative analysis:
Comparison: JWT vs. Session-Based Authentication
| Feature | JWT Authentication | Session-Based Authentication |
|---|---|---|
| Statefulness | Stateless (token contains all info) | Stateful (server stores session data) |
| Scalability | Highly scalable horizontally, ideal for microservices | Requires sticky sessions or shared session storage (e.g., Redis) |
| Cross-Domain | Easily works across different domains/subdomains | Challenging due to same-origin policy for cookies |
| Token Revocation | Requires additional mechanism (blacklisting) | Easier (delete session data from server) |
| Vulnerabilities | XSS (if stored insecurely), algorithm confusion, weak secrets | CSRF (if not properly protected), session hijacking |
| Storage | Local Storage (less secure), HTTP-only cookies (more secure) | HTTP-only cookies (recommended) |
While JWT offers significant advantages in distributed systems, the stateless nature means that server-side revocation (e.g., logging out all devices) requires explicit mechanisms like blacklisting. Session-based authentication, by contrast, allows for immediate server-side invalidation by simply deleting the session record.
IMPLEMENTATION GUIDE
Step-by-Step JWT Implementation Guide
Let’s walk through a practical implementation of JWT authentication using Node.js and Express, a popular choice for backend development in 2026. We’ll cover token generation, verification, and the refresh token mechanism.
Prerequisites
Ensure you have Node.js and npm installed. We’ll use the express and jsonwebtoken libraries.
CODE EXPLANATION
Install the necessary npm packages for our Express application.
npm init -y
npm install express jsonwebtoken dotenv cookie-parser
We’re also including dotenv for environment variables and cookie-parser for handling HTTP-only cookies.
Step 1: Environment Setup and Secret Keys
Never hardcode your JWT secrets! Use environment variables. Create a .env file:
CODE EXPLANATION
Define your JWT secret keys and token expiration times in a .env file. These should be strong, randomly generated strings.
# .env
ACCESS_TOKEN_SECRET="your_very_strong_access_token_secret_2026_random_string"
REFRESH_TOKEN_SECRET="your_even_stronger_refresh_token_secret_2026_another_random_string"
ACCESS_TOKEN_EXPIRATION="15m" # 15 minutes
REFRESH_TOKEN_EXPIRATION="7d" # 7 days
Ensure these secrets are truly random and long (at least 32 characters). You can generate them using node -e "console.log(require('crypto').randomBytes(32).toString('hex'))".
Step 2: Token Generation (Login Endpoint)
When a user successfully logs in, your server should generate both an access token and a refresh token.
CODE EXPLANATION
This code snippet sets up a basic Express server with a login endpoint. Upon successful login, it creates both an access token and a refresh token using jsonwebtoken.sign(). The refresh token is stored in an HTTP-only cookie for enhanced security.
// app.js (simplified)
require('dotenv').config();
const express = require('express');
const jwt = require('jsonwebtoken');
const cookieParser = require('cookie-parser');
const app = express();
const PORT = process.env.PORT || 3000;

app.use(express.json());
app.use(cookieParser());

const users = [ // In a real app, this would be a database
  { id: 1, username: 'user1', password: 'password1', roles: ['user'] },
  { id: 2, username: 'admin1', password: 'password2', roles: ['admin'] }
];

// In a real app, refresh tokens would be stored in a database
let refreshTokensDb = [];

// Helper function to generate tokens
const generateTokens = (user) => {
  const accessToken = jwt.sign(
    { id: user.id, roles: user.roles },
    process.env.ACCESS_TOKEN_SECRET,
    { expiresIn: process.env.ACCESS_TOKEN_EXPIRATION }
  );
  const refreshToken = jwt.sign(
    { id: user.id },
    process.env.REFRESH_TOKEN_SECRET,
    { expiresIn: process.env.REFRESH_TOKEN_EXPIRATION }
  );
  return { accessToken, refreshToken };
};

app.post('/login', (req, res) => {
  const { username, password } = req.body;
  const user = users.find(u => u.username === username && u.password === password);

  if (!user) {
    return res.status(401).json({ message: 'Invalid credentials' });
  }

  const { accessToken, refreshToken } = generateTokens(user);

  // Store refresh token (in a real app, this would be a secure database)
  refreshTokensDb.push(refreshToken);

  // Send refresh token as HTTP-only cookie
  res.cookie('refreshToken', refreshToken, {
    httpOnly: true,
    secure: process.env.NODE_ENV === 'production', // Use secure in production
    sameSite: 'Strict', // Protect against CSRF
    maxAge: 7 * 24 * 60 * 60 * 1000 // 7 days
  });

  res.json({ accessToken });
});

// ... other routes and middleware

app.listen(PORT, () => {
  console.log(`Server running on port ${PORT}`);
});
Step 3: Token Verification Middleware
This middleware will protect your routes by verifying the access token sent with each request.
CODE EXPLANATION
This middleware extracts the access token from the Authorization header, verifies it using jsonwebtoken.verify(), and attaches the decoded user information to the request object for subsequent route handlers.
// authMiddleware.js
const jwt = require('jsonwebtoken');

const authenticateToken = (req, res, next) => {
  const authHeader = req.headers['authorization'];
  const token = authHeader && authHeader.split(' ')[1]; // Bearer TOKEN

  if (token == null) return res.status(401).json({ message: 'Access token required' });

  jwt.verify(token, process.env.ACCESS_TOKEN_SECRET, (err, user) => {
    if (err) {
      // Token is expired or invalid
      return res.status(403).json({ message: 'Invalid or expired access token' });
    }
    req.user = user; // Attach user payload to request
    next();
  });
};

const authorizeRoles = (roles) => {
  return (req, res, next) => {
    if (!req.user || !req.user.roles) {
      return res.status(403).json({ message: 'User role information missing' });
    }
    const hasRole = req.user.roles.some(role => roles.includes(role));
    if (!hasRole) {
      return res.status(403).json({ message: 'Insufficient permissions' });
    }
    next();
  };
};

module.exports = { authenticateToken, authorizeRoles };
Now, apply this middleware to your protected routes:
CODE EXPLANATION
Example of how to use the authenticateToken and authorizeRoles middleware to protect an API endpoint.
// app.js (continued)
const { authenticateToken, authorizeRoles } = require('./authMiddleware');

app.get('/protected', authenticateToken, (req, res) => {
  res.json({ message: `Welcome ${req.user.id}! You have access to protected data.` });
});

app.get('/admin-only', authenticateToken, authorizeRoles(['admin']), (req, res) => {
  res.json({ message: `Welcome Admin ${req.user.id}! This is highly restricted data.` });
});
KEY POINT
Always use HTTP-only, secure cookies for refresh tokens to mitigate XSS attacks. Access tokens can be stored in memory on the client-side, reducing their exposure.
Step 4: Refreshing Access Tokens
When an access token expires, the client can use the refresh token to obtain a new one without requiring the user to log in again.
CODE EXPLANATION
This endpoint handles the refresh token flow. It retrieves the refresh token from the HTTP-only cookie, verifies it, and if valid, generates a new access token and potentially a new refresh token, updating the client’s cookies.
// app.js (continued)
app.post('/token', (req, res) => {
  const refreshToken = req.cookies.refreshToken;

  if (!refreshToken) return res.status(401).json({ message: 'Refresh token not found' });

  // In a real app, check if refresh token exists in database
  if (!refreshTokensDb.includes(refreshToken)) {
    return res.status(403).json({ message: 'Invalid refresh token' });
  }

  jwt.verify(refreshToken, process.env.REFRESH_TOKEN_SECRET, (err, user) => {
    if (err) return res.status(403).json({ message: 'Invalid or expired refresh token' });

    // Find user by ID from refresh token payload (in a real app, query database)
    const originalUser = users.find(u => u.id === user.id);
    if (!originalUser) {
        return res.status(403).json({ message: 'User associated with refresh token not found' });
    }

    const { accessToken, refreshToken: newRefreshToken } = generateTokens(originalUser);

    // Replace old refresh token with new one in DB (for rotation)
    refreshTokensDb = refreshTokensDb.filter(token => token !== refreshToken);
    refreshTokensDb.push(newRefreshToken);

    res.cookie('refreshToken', newRefreshToken, {
      httpOnly: true,
      secure: process.env.NODE_ENV === 'production',
      sameSite: 'Strict',
      maxAge: 7 * 24 * 60 * 60 * 1000
    });

    res.json({ accessToken });
  });
});
Note the refresh token rotation strategy: when a new access token is issued, a new refresh token is also issued, and the old one is invalidated. This enhances security by limiting the lifespan of a refresh token even if it’s stolen, as it can only be used once.
Step 5: Logout and Token Revocation
Logging out involves invalidating the refresh token and clearing the client-side cookies. For immediate access token revocation, a blacklist mechanism is needed.
CODE EXPLANATION
This logout endpoint clears the refresh token cookie and removes the refresh token from the server-side store, effectively logging the user out. It also optionally adds the access token to a blacklist for immediate invalidation.
// app.js (continued)
let accessTokenBlacklist = []; // In a real app, use a persistent store like Redis

app.post('/logout', (req, res) => {
  const refreshToken = req.cookies.refreshToken;
  if (!refreshToken) return res.sendStatus(204); // No content to send

  // Remove refresh token from DB
  refreshTokensDb = refreshTokensDb.filter(token => token !== refreshToken);

  // Clear cookie
  res.clearCookie('refreshToken', {
    httpOnly: true,
    secure: process.env.NODE_ENV === 'production',
    sameSite: 'Strict'
  });

  // Optionally, blacklist the current access token if present in header
  const authHeader = req.headers['authorization'];
  const accessToken = authHeader && authHeader.split(' ')[1];
  if (accessToken) {
    accessTokenBlacklist.push(accessToken); // Add to blacklist
    // For production, store expiration time with token to auto-remove from blacklist
  }

  res.sendStatus(204);
});

// Update authenticateToken to check blacklist
const authenticateTokenWithBlacklist = (req, res, next) => {
  const authHeader = req.headers['authorization'];
  const token = authHeader && authHeader.split(' ')[1];

  if (token == null) return res.status(401).json({ message: 'Access token required' });

  if (accessTokenBlacklist.includes(token)) {
    return res.status(403).json({ message: 'Token has been blacklisted' });
  }

  jwt.verify(token, process.env.ACCESS_TOKEN_SECRET, (err, user) => {
    if (err) {
      return res.status(403).json({ message: 'Invalid or expired access token' });
    }
    req.user = user;
    next();
  });
};

// Use authenticateTokenWithBlacklist instead of authenticateToken for protected routes
// app.get('/protected', authenticateTokenWithBlacklist, (req, res) => { ... });
PROBLEM SOLVING
Addressing Common JWT Security Challenges
Even with proper implementation, JWTs present several security challenges that developers must actively mitigate. Here are some common problems and their solutions for robust backend security in 2026.
PROBLEM 01
Cross-Site Scripting (XSS) Vulnerability
If access tokens are stored in client-side storage (e.g., Local Storage or Session Storage), a successful XSS attack can allow an attacker to steal the token and impersonate the user.
SOLUTION — Secure Token Storage
Access Tokens: Store short-lived access tokens primarily in memory on the client-side. When the page refreshes, the user might need to re-authenticate or use the refresh token to get a new access token. This limits the exposure window. If persistent storage is needed for access tokens, consider using Web Workers or a robust state management solution with strict security policies.
Refresh Tokens: Always store long-lived refresh tokens in HTTP-only, secure cookies. The httpOnly flag prevents client-side JavaScript from accessing the cookie, mitigating XSS. The Secure flag ensures the cookie is only sent over HTTPS. Also, use SameSite=Strict or Lax to prevent CSRF attacks.
PROBLEM 02
Lack of Token Revocation
JWTs are stateless, meaning once issued, they are valid until their expiration. This makes immediate revocation (e.g., when a user logs out, changes password, or is compromised) challenging, as the server doesn’t “know” about every active token.
SOLUTION — Implement Blacklisting and Refresh Token Rotation
Access Token Blacklist: For immediate revocation of access tokens (e.g., on logout or security event), maintain a server-side blacklist (e.g., using Redis for speed). When a token needs to be revoked, add its unique ID (JTI claim) to the blacklist. All subsequent requests with that token should be denied. The blacklist should store the token’s JTI and its expiration time, so entries can be automatically removed after the token naturally expires.
Refresh Token Rotation: When a refresh token is used to issue a new access token, invalidate the old refresh token and issue a new one. This “rotation” prevents an attacker from endlessly using a stolen refresh token, as each token is only valid for one use. Store refresh tokens in a database, linked to a user, and remove the old one upon use.
PROBLEM 03
Weak Secret Keys and Algorithm Confusion
Using weak or easily guessable secret keys for signing tokens makes them vulnerable to brute-force attacks. Additionally, some JWT libraries have been vulnerable to “algorithm confusion” attacks, where an attacker can force the server to verify a token signed with an asymmetric key (RSA) using a symmetric key (HMAC), if the public key is known.
SOLUTION — Strong Secrets and Explicit Algorithm Verification
Strong Secrets: Always use cryptographically strong, random, and sufficiently long secret keys (at least 256 bits for HS256, ideally 512 bits for HS512, or use RSA keys). Store them securely in environment variables or a secrets management service (e.g., AWS Secrets Manager, HashiCorp Vault).
Explicit Algorithm Verification: When verifying a JWT, always explicitly specify the expected algorithm (e.g., { algorithms: ['HS256'] } in jsonwebtoken.verify()). Never trust the alg header value directly from the token, as an attacker could manipulate it.
KEY POINT
The refresh token mechanism, coupled with HTTP-only cookies and server-side storage/rotation, is your primary defense against long-term compromise and enables effective session management in a stateless JWT system.
BEST PRACTICES
Best Practices for JWT Security in 2026
Beyond addressing common pitfalls, integrating a comprehensive set of security best practices is essential for any modern application. Here are the key considerations for JWT authentication in 2026:
Essential JWT Security Best Practices
1. Use HTTPS Everywhere: All communication involving JWTs (issuance, transmission, refresh) must occur over HTTPS. This encrypts data in transit, preventing eavesdropping and Man-in-the-Middle (MitM) attacks. Without HTTPS, even the most secure JWT implementation is vulnerable.
2. Short-Lived Access Tokens: Keep access token expiration times very short (e.g., 5-15 minutes). This limits the window of opportunity for attackers if a token is stolen. Rely on refresh tokens for a seamless user experience.
3. Long-Lived, Secure Refresh Tokens: Refresh tokens should have a longer lifespan (e.g., 7 days to 30 days) but must be stored securely in HTTP-only, secure, SameSite cookies. Pair them with refresh token rotation and server-side storage/invalidation.
4. Validate All Claims: Beyond signature verification, always validate standard claims like exp (expiration), nbf (not before), iss (issuer), and aud (audience) to ensure the token is used as intended and is still valid.
5. Use Strong, Up-to-Date Cryptographic Algorithms: Stick to industry-standard algorithms like HS256/HS512 (symmetric) or RS256/RS512 (asymmetric). Avoid deprecated algorithms like None. Regularly update your JWT library to patch any known vulnerabilities.
6. Implement Rate Limiting: Protect your authentication and token refresh endpoints with rate limiting to prevent brute-force attacks and denial-of-service attempts. A common practice is to limit login attempts to 5 per minute per IP address.
7. Avoid Storing Sensitive Data in JWT Payload: JWTs are signed, not encrypted by default. Any data in the payload is Base64Url encoded, meaning it’s readable by anyone who intercepts the token. Only include non-sensitive user identifiers and authorization claims (e.g., user ID, roles, permissions). If sensitive data is required, consider encryption (JWE) or fetching it from the database after token validation.
8. Consider Device Fingerprinting: For an extra layer of security, especially with refresh tokens, you can include a device fingerprint (e.g., user-agent hash, IP address) in the refresh token payload. When the token is used, verify if the device fingerprint matches. This can help detect unauthorized token usage if a refresh token is stolen.
PRACTICAL APPLICATION
Real-World Use Cases for JWT Authentication
JWT’s versatility makes it suitable for a wide array of modern application architectures. Here are some prominent use cases where JWT authentication shines in 2026:
Single Page Applications (SPAs)
SPAs, built with frameworks like React, Angular, or Vue.js, often interact with a backend API. JWTs provide a stateless way for the frontend to authenticate with the backend without relying on traditional browser sessions. The access token is typically stored in memory and sent with each API request via an Authorization header.
Mobile Applications
Similar to SPAs, mobile apps (iOS, Android, React Native, Flutter) communicate with backend APIs. JWTs are an excellent choice here because they are self-contained and don’t rely on cookies, which are less suitable for mobile environments. Tokens can be securely stored in the app’s secure storage (e.g., iOS Keychain, Android Keystore) and sent with API calls.
Microservices Architectures
In a microservices setup, a user might authenticate with an authentication service and receive a JWT. This token can then be passed to other microservices, which can independently verify the token’s signature and claims without needing to query a central session store. This promotes loose coupling and scalability, as each service can trust the token’s contents after verification.
Server-to-Server Communication
While typically using API keys or OAuth client credentials, JWTs can also be used for secure server-to-server communication where one service needs to assert its identity and permissions to another. A service can generate a JWT, sign it with its private key, and send it to another service, which verifies it using the first service’s public key.

Frequently Asked Questions About JWT Authentication
Q. What is the primary advantage of JWT over session-based authentication?
A. The primary advantage of JWT is its statelessness, which makes it highly scalable for distributed systems like microservices and multi-domain applications. The server does not need to store session information, reducing database load and simplifying horizontal scaling.
Q. Where should JWTs be stored on the client-side to be most secure?
A. Access tokens should ideally be stored in memory on the client-side, limiting their exposure to XSS attacks. Refresh tokens, which are long-lived, should be stored in HTTP-only, secure, and SameSite cookies to mitigate both XSS and CSRF risks.
Q. How do you revoke a JWT before its natural expiration?
A. Since JWTs are stateless, immediate revocation requires a server-side blacklist. When a token is to be revoked (e.g., user logout, password change), its unique identifier (JTI claim) is added to a blacklist (often in a fast cache like Redis), and subsequent requests with that token are rejected by the server.
Q. Is it safe to put sensitive user data in a JWT payload?
A. No, by default, JWT payloads are only Base64Url encoded, not encrypted. This means anyone with the token can read its contents. Only non-sensitive data, such as user IDs or roles, should be placed in the payload. For sensitive data, consider JSON Web Encryption (JWE) or fetching the data from a secure backend after token validation.
CONCLUSION
The Future of Secure JWT Authentication
As we look ahead in 2026, JSON Web Tokens remain a powerful and flexible tool for authentication in modern web and mobile applications. Their stateless nature aligns perfectly with the demands of scalable, distributed architectures like microservices and SPAs.
However, their power comes with a responsibility: developers must be diligent in their implementation and continuously adapt to evolving security threats.
The core principles of secure JWT usage—strong secrets, explicit algorithm verification, short-lived access tokens, and robust refresh token management with HTTP-only cookies and rotation—are not optional. They are foundational.
The landscape of web security is dynamic, with new vulnerabilities emerging regularly. Therefore, staying informed about the latest security advisories, regularly auditing your code, and keeping your libraries updated are crucial for maintaining a secure JWT implementation.
Ultimately, while JWTs simplify authentication, they shift some of the security burden to the developer. By following the guidelines and best practices outlined in this guide, you can build secure, resilient, and scalable authentication systems that stand strong against the threats of 2026 and beyond. The future of authentication is here, and with careful attention to detail, it can be secure.

Thanks for reading!
We hope this comprehensive guide helps you master secure JWT authentication for your backend applications in 2026.
Got feedback or questions? Drop a comment below!