
SUMMARY
Integrating OpenAI APIs into Your Web App: A Developer’s Guide in 2026
This practical guide shows developers how to seamlessly integrate OpenAI’s powerful APIs, like GPT and DALL-E, into their web applications in 2026.
Keywords: OpenAI API, AI integration, Web Development
TABLE OF CONTENTS
1. Introduction: The AI Frontier in 2026
2. Getting Started with OpenAI APIs: Foundations for Integration
3. Deep Dive into OpenAI APIs: GPT-4o and DALL-E 3
4. Overcoming Integration Challenges: Strategies for Robust Applications
5. Practical Applications: Building AI-Powered Features
6. Frequently Asked Questions
INTRODUCTION
The AI Frontier in 2026: Why OpenAI APIs Are Essential
Welcome back to Kwonglish! In 2026, the landscape of web development is undeniably shaped by Artificial Intelligence. What was once a niche technology is now a cornerstone for innovative applications, driving user engagement and delivering unprecedented capabilities. At the forefront of this revolution are Large Language Models (LLMs) and advanced image generation tools, with OpenAI’s APIs leading the charge.
Just a few years ago, integrating AI meant complex machine learning pipelines and deep expertise. Today, thanks to robust API offerings from companies like OpenAI, developers can infuse cutting-edge AI functionalities into their web applications with relative ease. This guide is designed for developers who want to leverage the power of OpenAI’s GPT and DALL-E APIs to create smarter, more dynamic, and engaging web experiences in 2026.
We’ll explore the practical steps, best practices, and common challenges you might encounter. Whether you’re looking to automate content creation, generate unique visuals, or build intelligent chatbots, understanding how to integrate these powerful tools is crucial for staying competitive and innovative in the current tech climate.
“By 2026, AI integration isn’t just an advantage; it’s becoming a fundamental expectation for modern web applications, enhancing everything from user experience to operational efficiency.”
KEY POINT
OpenAI’s GPT and DALL-E APIs offer developers a streamlined way to embed advanced AI capabilities, such as natural language processing and image generation, directly into their web applications, fostering innovation and enhancing user engagement.
GETTING STARTED
Getting Started with OpenAI APIs: Foundations for Integration
Before we dive into the exciting world of AI-powered features, let’s lay down the essential groundwork. Integrating any external API requires careful setup, especially when dealing with sensitive information or paid services. OpenAI’s APIs are no exception.
1. Setting Up Your OpenAI Account and API Key
First things first, you’ll need an OpenAI account. If you don’t have one, head over to platform.openai.com and sign up. Once logged in, navigate to the API keys section to generate your secret key. This key is your credential for authenticating with OpenAI’s services.
Your API key is a secret! Never expose it directly in client-side code (e.g., JavaScript in the browser). Always use a backend server to make calls to OpenAI APIs, passing your API key securely from the server.
2. Choosing Your Development Environment and Libraries
OpenAI provides official client libraries for Python and Node.js, making integration straightforward. For other languages, you can use standard HTTP client libraries to interact with their REST API directly. For this guide, we’ll primarily use Python due to its popularity in AI development and the robust features of its official library.
First, install the OpenAI Python library:
This command uses pip, Python’s package installer, to download and install the official OpenAI library into your current Python environment. It’s the first step to enabling API calls from your Python application.
pip install openai3. Securing Your API Key
As mentioned, never hardcode your API key. The best practice is to store it as an environment variable. This keeps your key out of your codebase and allows for easy management across different deployment environments.
These commands demonstrate how to set an environment variable on Linux/macOS and Windows. Replace your_api_key_here with your actual OpenAI API key. This variable can then be accessed programmatically in your Python code.
# On Linux/macOS
export OPENAI_API_KEY='your_api_key_here'

# On Windows (Command Prompt)
set OPENAI_API_KEY='your_api_key_here'

# On Windows (PowerShell)
$env:OPENAI_API_KEY='your_api_key_here'
In your Python code, you’d then access it like this:
This Python snippet imports the os module to interact with the operating system, specifically to retrieve the OPENAI_API_KEY environment variable. The openai.OpenAI() client will automatically pick up this variable if it’s set, simplifying key management.
import os
from openai import OpenAI

# The client will automatically pick up the OPENAI_API_KEY environment variable
client = OpenAI()

# You can also explicitly pass the API key if needed:
# client = OpenAI(api_key=os.environ.get("OPENAI_API_KEY"))

# Now 'client' is ready to make API calls
Always prioritize API key security by storing it as an environment variable and making all API calls from a secure backend server to prevent unauthorized access and potential abuse.

CORE CONTENT
Deep Dive into OpenAI APIs: GPT-4o and DALL-E 3
In 2026, OpenAI’s flagship models, particularly GPT-4o for language and DALL-E 3 for image generation, offer unparalleled capabilities. Let’s explore how to interact with these powerful models programmatically.
1. Integrating GPT-4o for Advanced Text Generation
GPT-4o, released in late 2025, represents a significant leap in multimodal AI, excelling not just in text generation but also in understanding and generating audio and images. For web applications, its text capabilities remain paramount for tasks like content creation, summarization, translation, and sophisticated chatbot interactions.
The chat/completions endpoint is your primary interface for GPT models. You send a list of messages, simulating a conversation, and the model responds.
This Python code snippet demonstrates how to make a basic request to the GPT-4o model. We define a system role to set the AI’s persona and a user role for the prompt. The response contains the generated text, which is then extracted and printed. The temperature parameter controls the randomness of the output (0.7 is a good balance).
import os
from openai import OpenAI

client = OpenAI()

def generate_text_with_gpt(prompt_text, model="gpt-4o", temperature=0.7):
    try:
        response = client.chat.completions.create(
            model=model,
            messages=[
                {"role": "system", "content": "You are a helpful assistant for web developers."},
                {"role": "user", "content": prompt_text}
            ],
            temperature=temperature,
            max_tokens=150 # Limit response length
        )
        return response.choices[0].message.content
    except Exception as e:
        return f"An error occurred: {e}"

# Example Usage:
user_prompt = "Explain the concept of serverless architecture in the context of web development, focusing on benefits for scalability."
generated_content = generate_text_with_gpt(user_prompt)
print(generated_content)
2. Integrating DALL-E 3 for Dynamic Image Generation
DALL-E 3, also integrated with OpenAI’s API, allows you to generate high-quality, diverse images from text descriptions. This is incredibly powerful for applications requiring dynamic visual content, such as custom avatars, marketing material generation, or unique illustrations for blog posts. In 2026, DALL-E 3 offers enhanced prompt understanding and image quality compared to its predecessors.
This Python function uses the images.generate endpoint to create an image. You provide a prompt, specify the model (DALL-E 3), desired size, and quality. The response includes a URL to the generated image, which you can then display in your web application.
import os
from openai import OpenAI

client = OpenAI()

def generate_image_with_dalle(prompt_text, model="dall-e-3", size="1024x1024", quality="standard"):
    try:
        response = client.images.generate(
            model=model,
            prompt=prompt_text,
            size=size,
            quality=quality,
            n=1 # Number of images to generate
        )
        image_url = response.data[0].url
        return image_url
    except Exception as e:
        return f"An error occurred: {e}"

# Example Usage:
image_prompt = "A futuristic city at sunset with flying cars and neon signs, high detail, digital art."
generated_image_url = generate_image_with_dalle(image_prompt)
print(f"Generated Image URL: {generated_image_url}")
3. Comparative Analysis: Model Performance and Cost in 2026
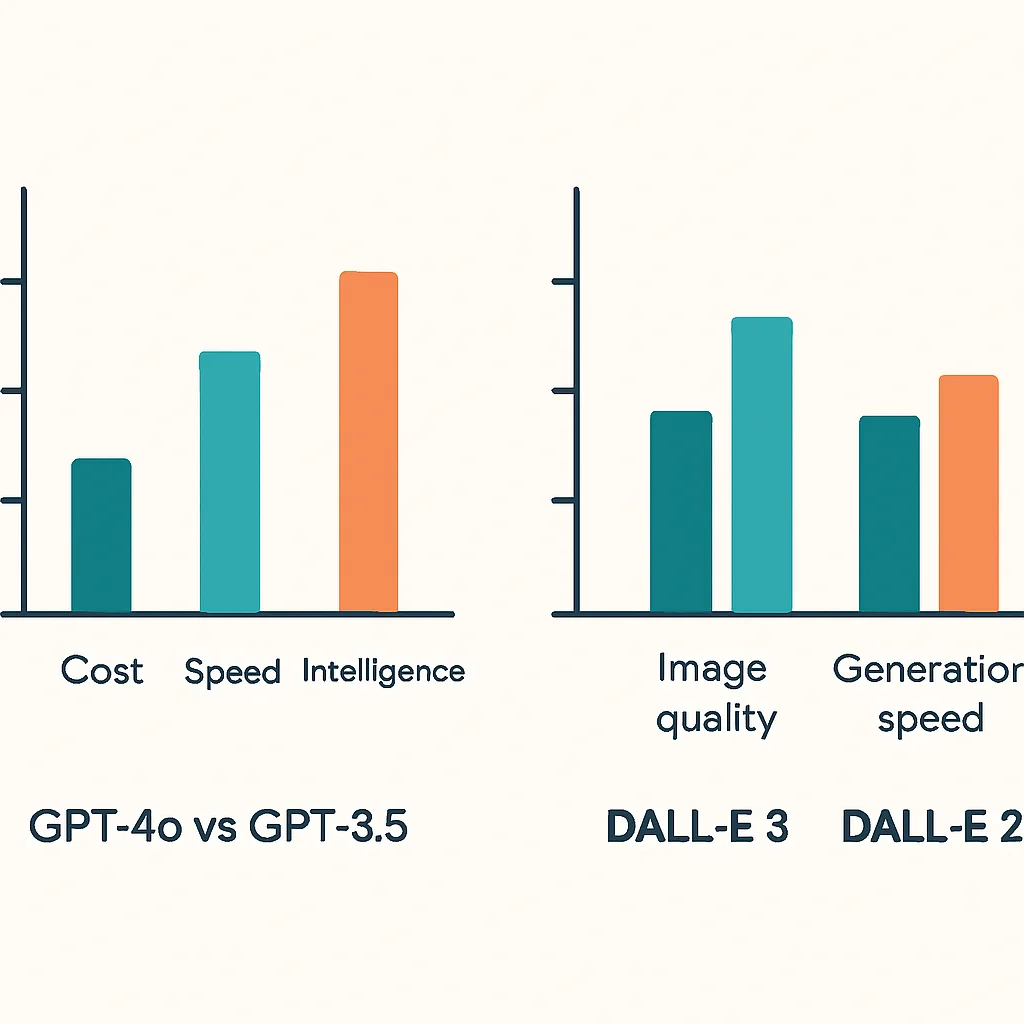
Choosing the right model is crucial for balancing performance and cost. While GPT-4o and DALL-E 3 are top-tier, older models like GPT-3.5 Turbo still offer excellent value for less demanding tasks.
Here’s a simplified comparison of costs and capabilities as of early 2026:
OpenAI API Model Comparison (Early 2026)
GPT-4o — Cost: ~$5.00/M tokens input, ~$15.00/M tokens output. Capabilities: Multimodal (text, audio, vision), highly intelligent, best for complex tasks, reasoning, and creative content. Response Time: Generally fast, under 1 second for typical requests.
GPT-3.5 Turbo — Cost: ~$0.50/M tokens input, ~$1.50/M tokens output. Capabilities: Fast, cost-effective, good for simpler text generation, summarization, and basic chatbots. Response Time: Very fast, often under 500ms.
DALL-E 3 — Cost: ~$0.02 – $0.04 per image (depending on size/quality). Capabilities: High-quality image generation from text, excellent prompt understanding, realistic and artistic styles. Response Time: 10-30 seconds per image.
DALL-E 2 — Cost: ~$0.01 – $0.02 per image. Capabilities: Good for general image generation, less detailed than DALL-E 3, lower prompt fidelity. Response Time: 5-15 seconds per image.
As you can see, the cost difference between GPT-3.5 Turbo and GPT-4o is substantial. For applications where budget is a primary concern, optimizing model choice based on the task complexity is paramount. For image generation, DALL-E 3 typically offers superior results for a slightly higher price, justifying the cost for professional-grade visual content.
Select your OpenAI model based on a balance of required intelligence, speed, and cost. GPT-4o offers peak performance for complex language tasks and multimodality, while GPT-3.5 Turbo provides a cost-effective solution for simpler text interactions. DALL-E 3 is the go-to for high-fidelity image generation.
PROBLEM SOLVING
Overcoming Integration Challenges: Strategies for Robust Applications
Integrating external APIs, especially those as powerful and dynamic as OpenAI’s, comes with its own set of challenges. Proactive planning and robust error handling are essential for building reliable and scalable web applications in 2026.
PROBLEM 01
Rate Limiting and API Throttling
OpenAI imposes rate limits on API requests to ensure fair usage and system stability. Exceeding these limits results in HTTP 429 “Too Many Requests” errors, interrupting your application’s flow.
SOLUTION — Implement Retry Mechanisms with Exponential Backoff
A common strategy is to catch 429 errors and retry the request after a delay. Exponential backoff increases the delay with each subsequent retry, preventing a flood of retries and giving the API server time to recover. Libraries like tenacity in Python make this easy.
This Python code snippet demonstrates how to use the tenacity library to automatically retry API calls that encounter rate limits or other temporary errors. The @retry decorator, configured with wait_exponential, ensures that the function waits for an exponentially increasing amount of time between retries, up to a maximum of 10 seconds, for up to 5 attempts. It specifically retries on openai.APITimeoutError and openai.RateLimitError, which are common transient issues.
from tenacity import (
    retry,
    stop_after_attempt,
    wait_random_exponential,
)
import openai

@retry(wait=wait_random_exponential(min=1, max=10), stop=stop_after_attempt(5))
def chat_completion_with_backoff(**kwargs):
    return openai.chat.completions.create(**kwargs)

# Example usage with retry:
# response = chat_completion_with_backoff(
#     model="gpt-4o",
#     messages=[{"role": "user", "content": "Hello world!"}],
# )
# print(response.choices[0].message.content)
PROBLEM 02
Managing API Costs
OpenAI API usage is billed per token for GPT models and per image for DALL-E. Uncontrolled usage can quickly lead to unexpected costs, especially with high-volume or inefficient requests.
SOLUTION — Implement Monitoring, Quotas, and Prompt Optimization
1. Monitor Usage: Regularly check your OpenAI dashboard for usage statistics. Set up billing alerts to notify you when spending approaches a predefined threshold. Many cloud providers offer integration for monitoring external API costs.
2. Set Quotas: If building a multi-user application, implement internal quotas to limit individual user consumption of AI resources. This could be a daily token limit for content generation or a monthly image generation cap.
3. Optimize Prompts: For text generation, be concise. Every token counts. Experiment with shorter prompts that still yield desired results. For DALL-E, clear but not overly verbose prompts can be more efficient.
4. Model Selection: As discussed, use GPT-3.5 Turbo for tasks that don’t absolutely require GPT-4o’s advanced reasoning. This alone can reduce costs by a factor of 10 or more for text-based applications.
Robust error handling, especially for rate limits, using strategies like exponential backoff, is critical for application stability. Equally important is diligent cost management through monitoring, quotas, and strategic prompt/model optimization to prevent unexpected expenditures.

PRACTICAL APPLICATION
Practical Applications: Building AI-Powered Features
Now that we’ve covered the fundamentals and potential challenges, let’s look at how to apply these integrations to build real-world, AI-powered features for your web applications in 2026. We’ll outline two common use cases.
Use Case 1: AI-Powered Blog Post Generator (GPT-4o)
Imagine a content management system where users can input a topic, and the AI generates a draft blog post. This significantly speeds up content creation.
Scenario
A user provides a title or a few keywords, and the web application generates a unique blog post draft using GPT-4o, ready for human review and editing.
Backend Logic (Python/Flask example):
The backend would receive the user’s topic, call the GPT API, and send the generated text back to the frontend.
This Flask route sets up an API endpoint /generate-blog-post that accepts a JSON payload with a topic. It then constructs a prompt for GPT-4o to generate a blog post. Error handling is included to catch API issues. The generated content is returned as JSON.
# app.py (Flask Backend)
from flask import Flask, request, jsonify
from openai import OpenAI
import os

app = Flask(__name__)
client = OpenAI() # Assumes OPENAI_API_KEY is set as an environment variable

@app.route('/generate-blog-post', methods=['POST'])
def generate_blog_post():
    data = request.get_json()
    topic = data.get('topic')

    if not topic:
        return jsonify({"error": "Topic is required"}), 400

    try:
        prompt = f"Write a compelling blog post about '{topic}', focusing on modern trends and insights for 2026. Include an introduction, 2-3 main points, and a conclusion. Make it engaging and informative."

        response = client.chat.completions.create(
            model="gpt-4o",
            messages=[
                {"role": "system", "content": "You are a professional blog post writer."},
                {"role": "user", "content": prompt}
            ],
            temperature=0.8,
            max_tokens=500
        )
        blog_content = response.choices[0].message.content
        return jsonify({"blog_post": blog_content})
    except Exception as e:
        return jsonify({"error": str(e)}), 500

if __name__ == '__main__':
    app.run(debug=True)
Frontend Interaction (JavaScript/Fetch API):
A simple HTML page with an input field and a button to trigger the API call, displaying the result.
<!-- index.html (Frontend) -->
<!DOCTYPE html>
<html lang="en">
<head>
    <meta charset="UTF-8">
    <meta name="viewport" content="width=device-width, initial-scale=1.0">
    <title>AI Blog Post Generator</title>
    <style>
        body { font-family: sans-serif; margin: 20px; }
        #output { border: 1px solid #ccc; padding: 15px; margin-top: 20px; white-space: pre-wrap; }
        button { padding: 10px 15px; background-color: #667eea; color: white; border: none; border-radius: 5px; cursor: pointer; }
        input { padding: 8px; width: 300px; border: 1px solid #ccc; border-radius: 4px; }
    </style>
</head>
<body>
    <h1>AI Blog Post Generator</h1>
    <input type="text" id="topicInput" placeholder="Enter blog post topic (e.g., 'Future of AI in Web Development')">
    <button onclick="generatePost()">Generate Post</button>
    <div id="output">Generated content will appear here...</div>

    <script>
        async function generatePost() {
            const topic = document.getElementById('topicInput').value;
            const outputDiv = document.getElementById('output');
            outputDiv.innerText = 'Generating post... please wait.';

            try {
                const response = await fetch('/generate-blog-post', {
                    method: 'POST',
                    headers: {
                        'Content-Type': 'application/json',
                    },
                    body: JSON.stringify({ topic: topic }),
                });

                if (!response.ok) {
                    const errorData = await response.json();
                    throw new Error(errorData.error || 'Failed to generate post');
                }

                const data = await response.json();
                outputDiv.innerText = data.blog_post;
            } catch (error) {
                outputDiv.innerText = 'Error: ' + error.message;
                console.error('Error generating blog post:', error);
            }
        }
    </script>
</body>
</html>
Use Case 2: Dynamic Banner Image Creator (DALL-E 3)
For e-commerce sites or marketing platforms, generating unique banner images based on product descriptions or campaign themes can be a game-changer.
Scenario
A user inputs a short description (e.g., “vintage typewriter with coffee cup on a wooden desk”), and the web app generates a high-resolution image using DALL-E 3.
Backend Logic (Python/Flask example):
Similar to the GPT example, the backend handles the API call to DALL-E and returns the image URL.
This Flask route /generate-image takes an image_prompt from the request. It then calls the DALL-E 3 API to generate an image of a specified size and quality. The URL of the generated image is returned in the JSON response.
# app.py (Flask Backend - add to existing app)
# ... (imports and client initialization as before) ...

@app.route('/generate-image', methods=['POST'])
def generate_image():
    data = request.get_json()
    image_prompt = data.get('image_prompt')

    if not image_prompt:
        return jsonify({"error": "Image prompt is required"}), 400

    try:
        response = client.images.generate(
            model="dall-e-3",
            prompt=image_prompt,
            size="1024x1024", # Can be "1024x1024", "1792x1024", or "1024x1792"
            quality="standard", # or "hd" for higher quality, higher cost
            n=1
        )
        image_url = response.data[0].url
        return jsonify({"image_url": image_url})
    except Exception as e:
        return jsonify({"error": str(e)}), 500

# ... (main block) ...
Frontend Interaction (JavaScript/Fetch API):
This frontend code handles the image generation. It takes a prompt, sends it to the backend, and upon receiving an image URL, dynamically creates an <img> tag to display the generated image. A loading state and error messages are also managed.
<!-- index.html (Frontend - add to existing body) -->
<h1>AI Image Generator</h1>
<input type="text" id="imagePromptInput" placeholder="Describe the image (e.g., 'A vintage typewriter on a wooden desk')">
<button onclick="generateImage()">Generate Image</button>
<div id="imageOutput">
<p>Generated image will appear here...</p>
</div>
<script>
async function generateImage() {
const prompt = document.getElementById('imagePromptInput').value;
const imageOutputDiv = document.getElementById('imageOutput');
imageOutputDiv.innerHTML = '<p>Generating image... this might take a moment.</p>';
try {
const response = await fetch('/generate-image', {
method: 'POST',
headers: {
'Content-Type': 'application/json',
},
body: JSON.stringify({ image_prompt: prompt }),
});
if (!response.ok) {
const errorData = await response.json();
throw new Error(errorData.error || 'Failed to generate image');
}
const data = await response.json();
const imageUrl = data.image_url;
imageOutputDiv.innerHTML = `<img src="${imageUrl}" alt="${prompt}" style="max-width: 100%; height: auto; border-radius: 8px;">`;
} catch (error) {
imageOutputDiv.innerHTML = '<p style="color: red;">Error: ' + error.message + '</p>';
console.error('Error generating image:', error);
}
}
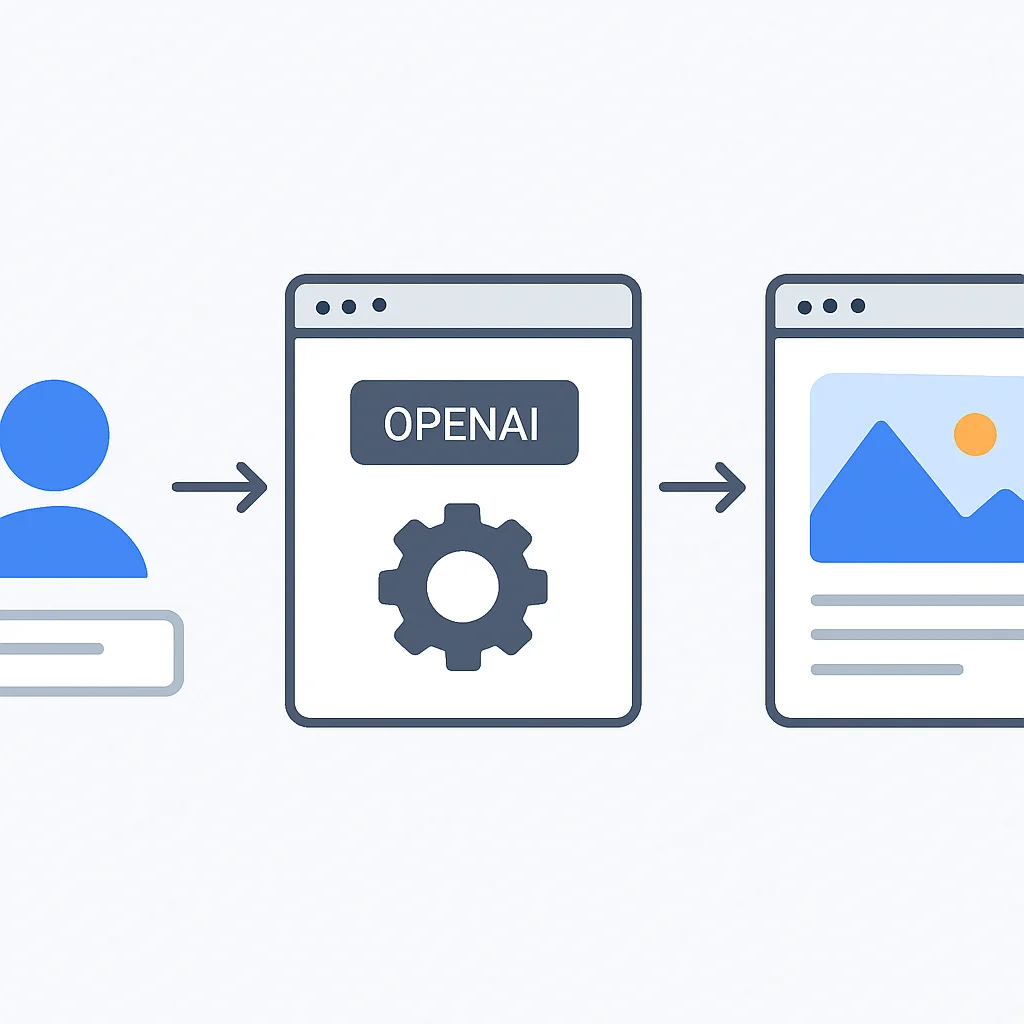
</script>Practical applications of OpenAI APIs involve a backend service to securely manage API keys and handle requests, and a frontend to provide a user interface. This client-server architecture ensures security, scalability, and a smooth user experience for AI-powered features.
Frequently Asked Questions
Q. What are the main differences between GPT-4o and GPT-3.5 Turbo for web app integration in 2026?
GPT-4o is OpenAI’s most advanced model in 2026, offering superior intelligence, multimodal capabilities (text, audio, vision), and complex reasoning, but at a higher cost. GPT-3.5 Turbo is a more cost-effective and faster alternative, ideal for simpler text generation, summarization, and basic chatbot interactions where extreme sophistication isn’t required.
Q. How can I ensure my OpenAI API key remains secure in my web application?
To ensure security, never expose your API key directly in client-side code. Always store it as an environment variable on your server and make all API calls from your backend. This prevents unauthorized users from accessing your key and incurring charges on your account.
Q. What are the best practices for managing API costs when using OpenAI services?
Effective cost management involves several strategies: regularly monitoring your usage on the OpenAI dashboard, setting up billing alerts, implementing internal quotas for users, optimizing your prompts to be concise, and choosing the most cost-effective model (e.g., GPT-3.5 Turbo) for tasks that don’t require the highest-tier models.
Q. What should I do if my application encounters OpenAI API rate limits?
When encountering rate limits (HTTP 429 errors), implement a retry mechanism with exponential backoff. This means your application should wait for an increasingly longer period before retrying the request, giving the API server time to process other requests and reset your limit. Libraries like Python’s tenacity can automate this process.
Q. Can DALL-E 3 generate images in specific aspect ratios, and how does quality affect cost?
Yes, DALL-E 3 supports specific aspect ratios like “1024×1024”, “1792×1024”, or “1024×1792”. The quality parameter can be set to “standard” or “hd”. “HD” quality images offer finer details and improved consistency but typically come at a higher cost per image compared to “standard” quality.
WRAP-UP
Conclusion: Embracing the AI-Powered Future
The journey of integrating OpenAI APIs into your web applications is an exciting one, opening up a world of possibilities for innovation and enhanced user experiences. In 2026, the ease of access to powerful AI models like GPT-4o and DALL-E 3 means that developers, regardless of their deep AI expertise, can create truly intelligent and dynamic web services.
We’ve covered the essential steps from setting up your environment and securing your API keys to making practical calls for text and image generation. We’ve also delved into critical considerations like managing costs and handling common integration challenges such as rate limiting. By following these guidelines, you’re well-equipped to build robust, efficient, and cost-aware AI-powered features.
The future of web development is undeniably intertwined with AI. As these models continue to evolve, offering more capabilities and better performance, the ability to seamlessly integrate them will be a defining skill for developers. So go forth, experiment, and build the next generation of intelligent web applications!
Successful OpenAI API integration hinges on secure key management, strategic model selection, diligent cost control, and robust error handling. These practices ensure that your AI-powered web applications are not only innovative but also reliable and sustainable in the long run.
THANKS FOR READING!
We hope this guide helps you unlock the full potential of OpenAI APIs in your web development projects.
Got questions or built something awesome? Drop a comment below and share your insights!